> ## Documentation Index
> Fetch the complete documentation index at: https://docs.root.io/llms.txt
> Use this file to discover all available pages before exploring further.
# SSO with Okta
> Configure single sign-on between your Okta Workforce Identity tenant and Root using SAML 2.0.
This guide walks through configuring SSO between your Okta Workforce Identity tenant and Root using SAML 2.0. The process has two parts: configuration you complete in Okta, and configuration Root's support team completes on the Auth0 side.
## Prerequisites
* Admin access to your Okta organization
* A Root support contact to complete the Auth0 side of setup — [contact Root](https://root.io) if you don't have one
* A `CONNECTION_NAME` agreed upon with Root (see Step 1)
* Group names should be `root-io-admins`, `root-io-members` and `root-io-readonlys`. if they need to change, contact Root support.
## Step 1: Define a Connection Name
Choose a `CONNECTION_NAME` that will be used in both Okta and Auth0 to identify this integration.
Once set in Auth0, the connection name **cannot be changed**. Agree on the
name with your Root support contact before proceeding.
**Format requirements:**
* All lowercase
* No spaces
* No special characters
**Example:** `acme-okta-saml`
## Step 2: Configure Okta
### 2.1 Create a SAML 2.0 App Integration
1. In your Okta Admin Console, go to **Applications > Applications**
2. Click **Create App Integration**
3. Select **SAML 2.0** and click **Next**
4. In **General Settings**, enter an app name (e.g., `Root SAML 2.0`) and click **Next**
### 2.2 Configure SAML Settings
In the **Configure SAML** tab, enter the following:
| Field | Value |
| --------------------------- | ----------------------------------------------------------------- |
| Single sign-on URL | `https://login.root.io/login/callback?connection=CONNECTION_NAME` |
| Audience URI (SP Entity ID) | `urn:auth0:slimdotai:CONNECTION_NAME` |
Replace `CONNECTION_NAME` with your chosen value from Step 1. For example, using `acme-okta-saml`:
| Field | Example value |
| ------------------ | ---------------------------------------------------------------- |
| Single sign-on URL | `https://login.root.io/login/callback?connection=acme-okta-saml` |
| Audience URI | `urn:auth0:slimdotai:acme-okta-saml` |
Scroll down and click **Next**, then **Finish** on the Feedback tab.
### 2.3 Collect IdP Values for Root
In the **Sign On** tab:
1. Click **View SAML setup instructions**
2. Copy the **Identity Provider Single Sign-On URL**
3. Click **Download Certificate** to get the X.509 certificate file (`okta.cert`) - if file is not downloaded when clicking the link, right-click the button and select 'Open link in new tab'
If the certificate download does not trigger, open the link in a new browser
tab.
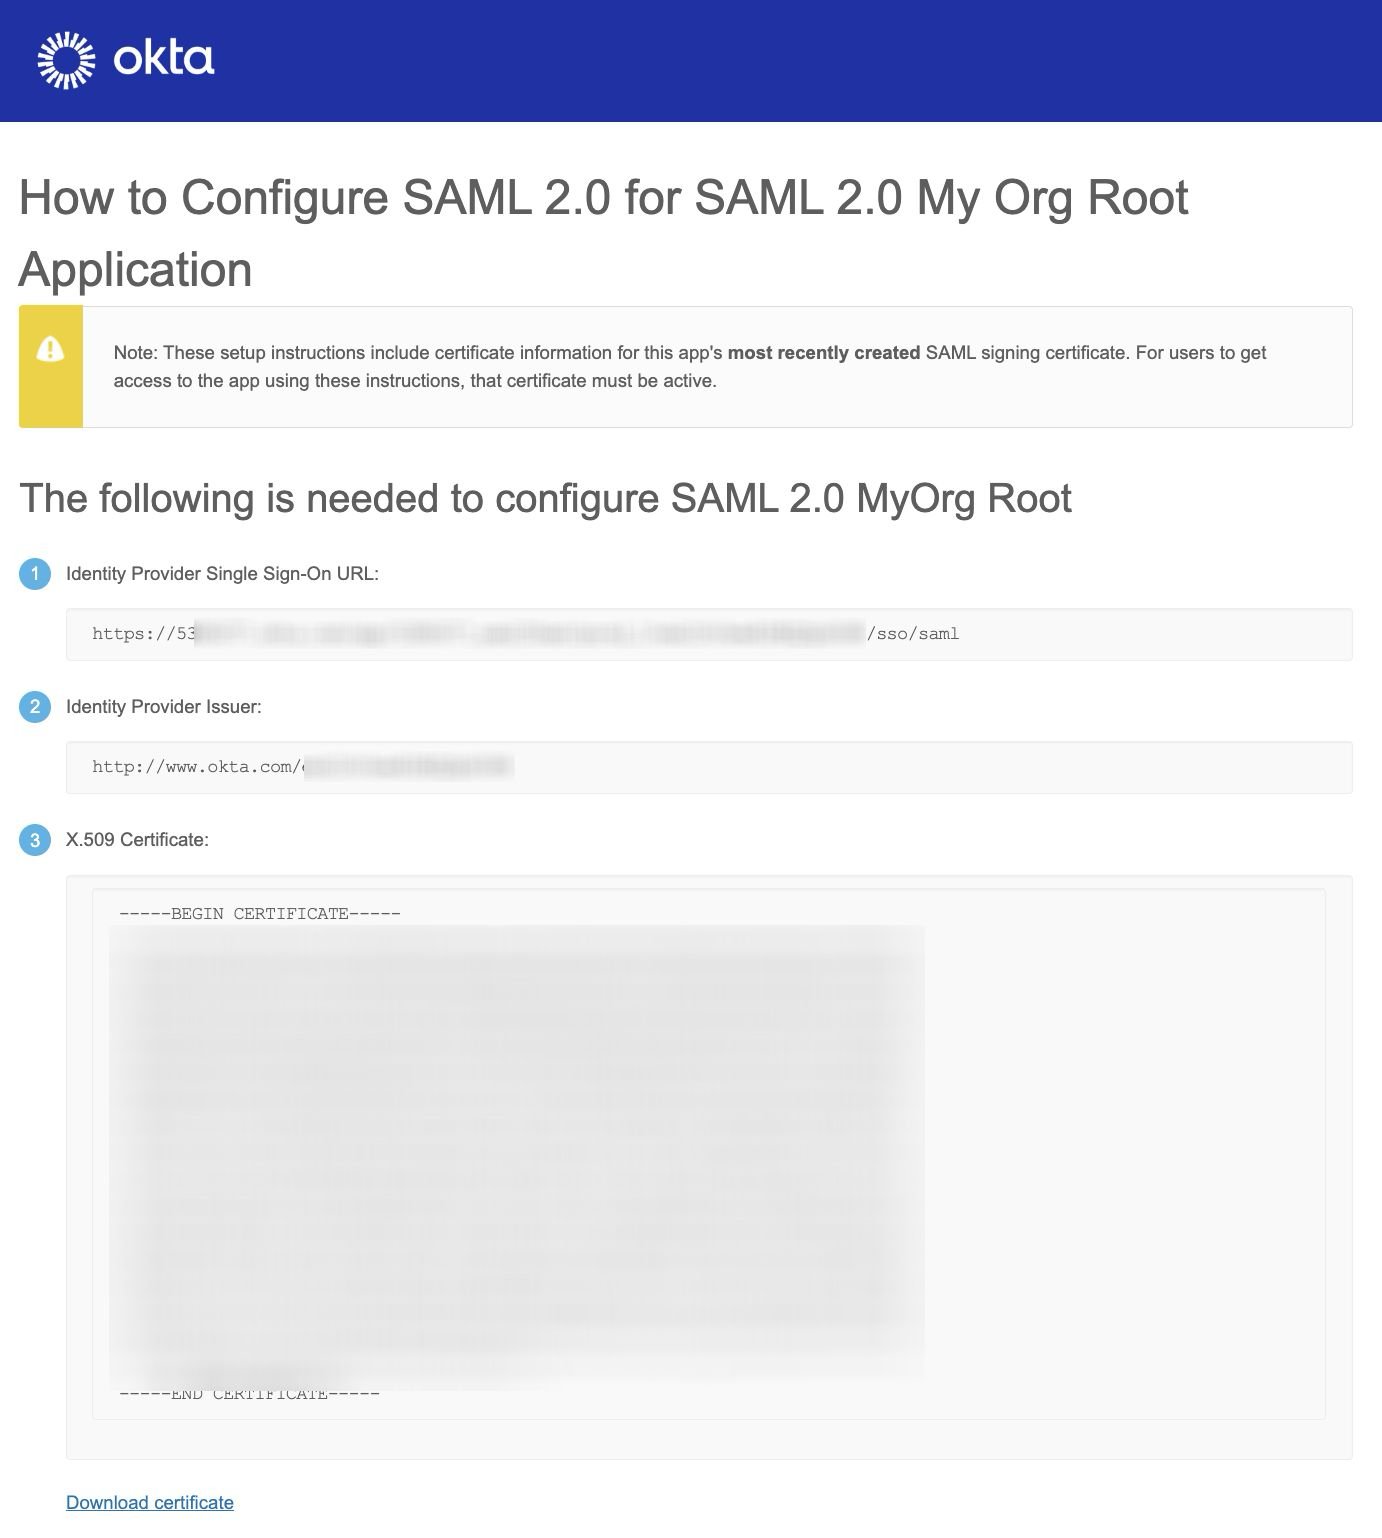 Send both the **IdP SSO URL** and the **certificate file** to your Root support contact.
The SAML setup instructions page displays three values:
| # | Field | Example |
| - | ------------------------------------ | --------------------------------------------------------------------------------------------- |
| 1 | Identity Provider Single Sign-On URL | `https://your-org.okta.com/app/your-app/exk.../sso/saml` |
| 2 | Identity Provider Issuer | `http://www.okta.com/exk...` |
| 3 | X.509 Certificate | PEM-encoded certificate block (`-----BEGIN CERTIFICATE-----` ... `-----END CERTIFICATE-----`) |
Copy the **Single Sign-On URL** (item 1) and click **Download certificate** at the bottom of the page to save the X.509 certificate file.
### 2.4 Add Attribute Statements
Still in the **Sign On** tab:
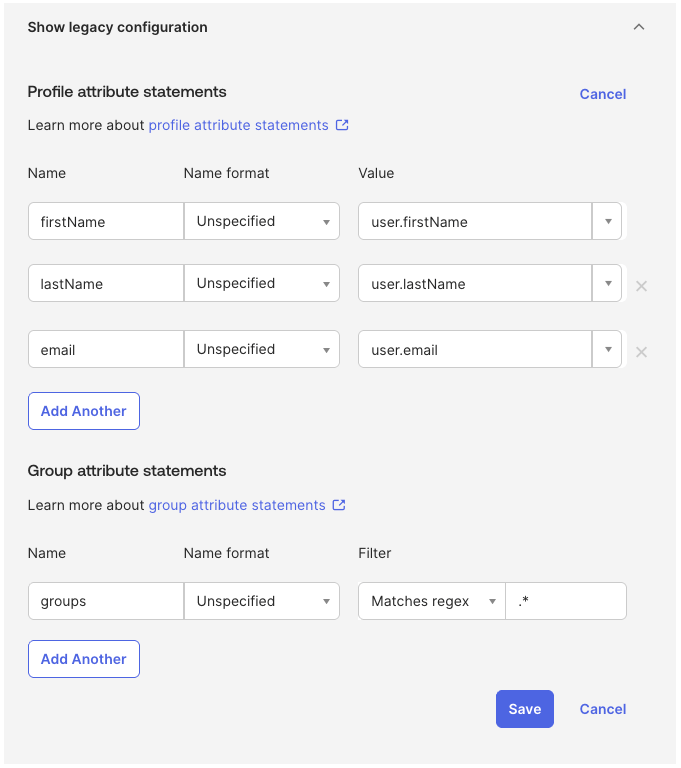
1. In the **Attribute statements** panel, click **Show legacy configuration**
2. Click **Edit** under **Profile attribute statements**
3. Add the following three rows:
| Name | Name format | Value |
| ----------- | ----------- | ---------------- |
| `firstName` | Unspecified | `user.firstName` |
| `lastName` | Unspecified | `user.lastName` |
| `email` | Unspecified | `user.email` |
4. Under **Group attribute statements**, have a single row and enter the following:
| Name | Name format | Filter | (filter value) |
| -------- | ----------- | --------------- | -------------- |
| `groups` | Unspecified | `Matches regex` | `.*` |
5. Click **Save**
Send both the **IdP SSO URL** and the **certificate file** to your Root support contact.
The SAML setup instructions page displays three values:
| # | Field | Example |
| - | ------------------------------------ | --------------------------------------------------------------------------------------------- |
| 1 | Identity Provider Single Sign-On URL | `https://your-org.okta.com/app/your-app/exk.../sso/saml` |
| 2 | Identity Provider Issuer | `http://www.okta.com/exk...` |
| 3 | X.509 Certificate | PEM-encoded certificate block (`-----BEGIN CERTIFICATE-----` ... `-----END CERTIFICATE-----`) |
Copy the **Single Sign-On URL** (item 1) and click **Download certificate** at the bottom of the page to save the X.509 certificate file.
### 2.4 Add Attribute Statements
Still in the **Sign On** tab:
1. In the **Attribute statements** panel, click **Show legacy configuration**
2. Click **Edit** under **Profile attribute statements**
3. Add the following three rows:
| Name | Name format | Value |
| ----------- | ----------- | ---------------- |
| `firstName` | Unspecified | `user.firstName` |
| `lastName` | Unspecified | `user.lastName` |
| `email` | Unspecified | `user.email` |
4. Under **Group attribute statements**, have a single row and enter the following:
| Name | Name format | Filter | (filter value) |
| -------- | ----------- | --------------- | -------------- |
| `groups` | Unspecified | `Matches regex` | `.*` |
5. Click **Save**
 ### 2.5 Assign Groups
1. Go to **Directory > Groups**
2. Click **Add group** and add 3 groups
* `root-io-admins`
* `root-io-members`
* `root-io-readonlys`
3. For each group, assign the appropriate people
4. Go to the **Applications > Application > \[app]** tab for your app
5. Click **Assign > Assign to groups**
6. Assign the 3 groups and click **Save**, then **Done**
### 2.5 Assign Groups
1. Go to **Directory > Groups**
2. Click **Add group** and add 3 groups
* `root-io-admins`
* `root-io-members`
* `root-io-readonlys`
3. For each group, assign the appropriate people
4. Go to the **Applications > Application > \[app]** tab for your app
5. Click **Assign > Assign to groups**
6. Assign the 3 groups and click **Save**, then **Done**
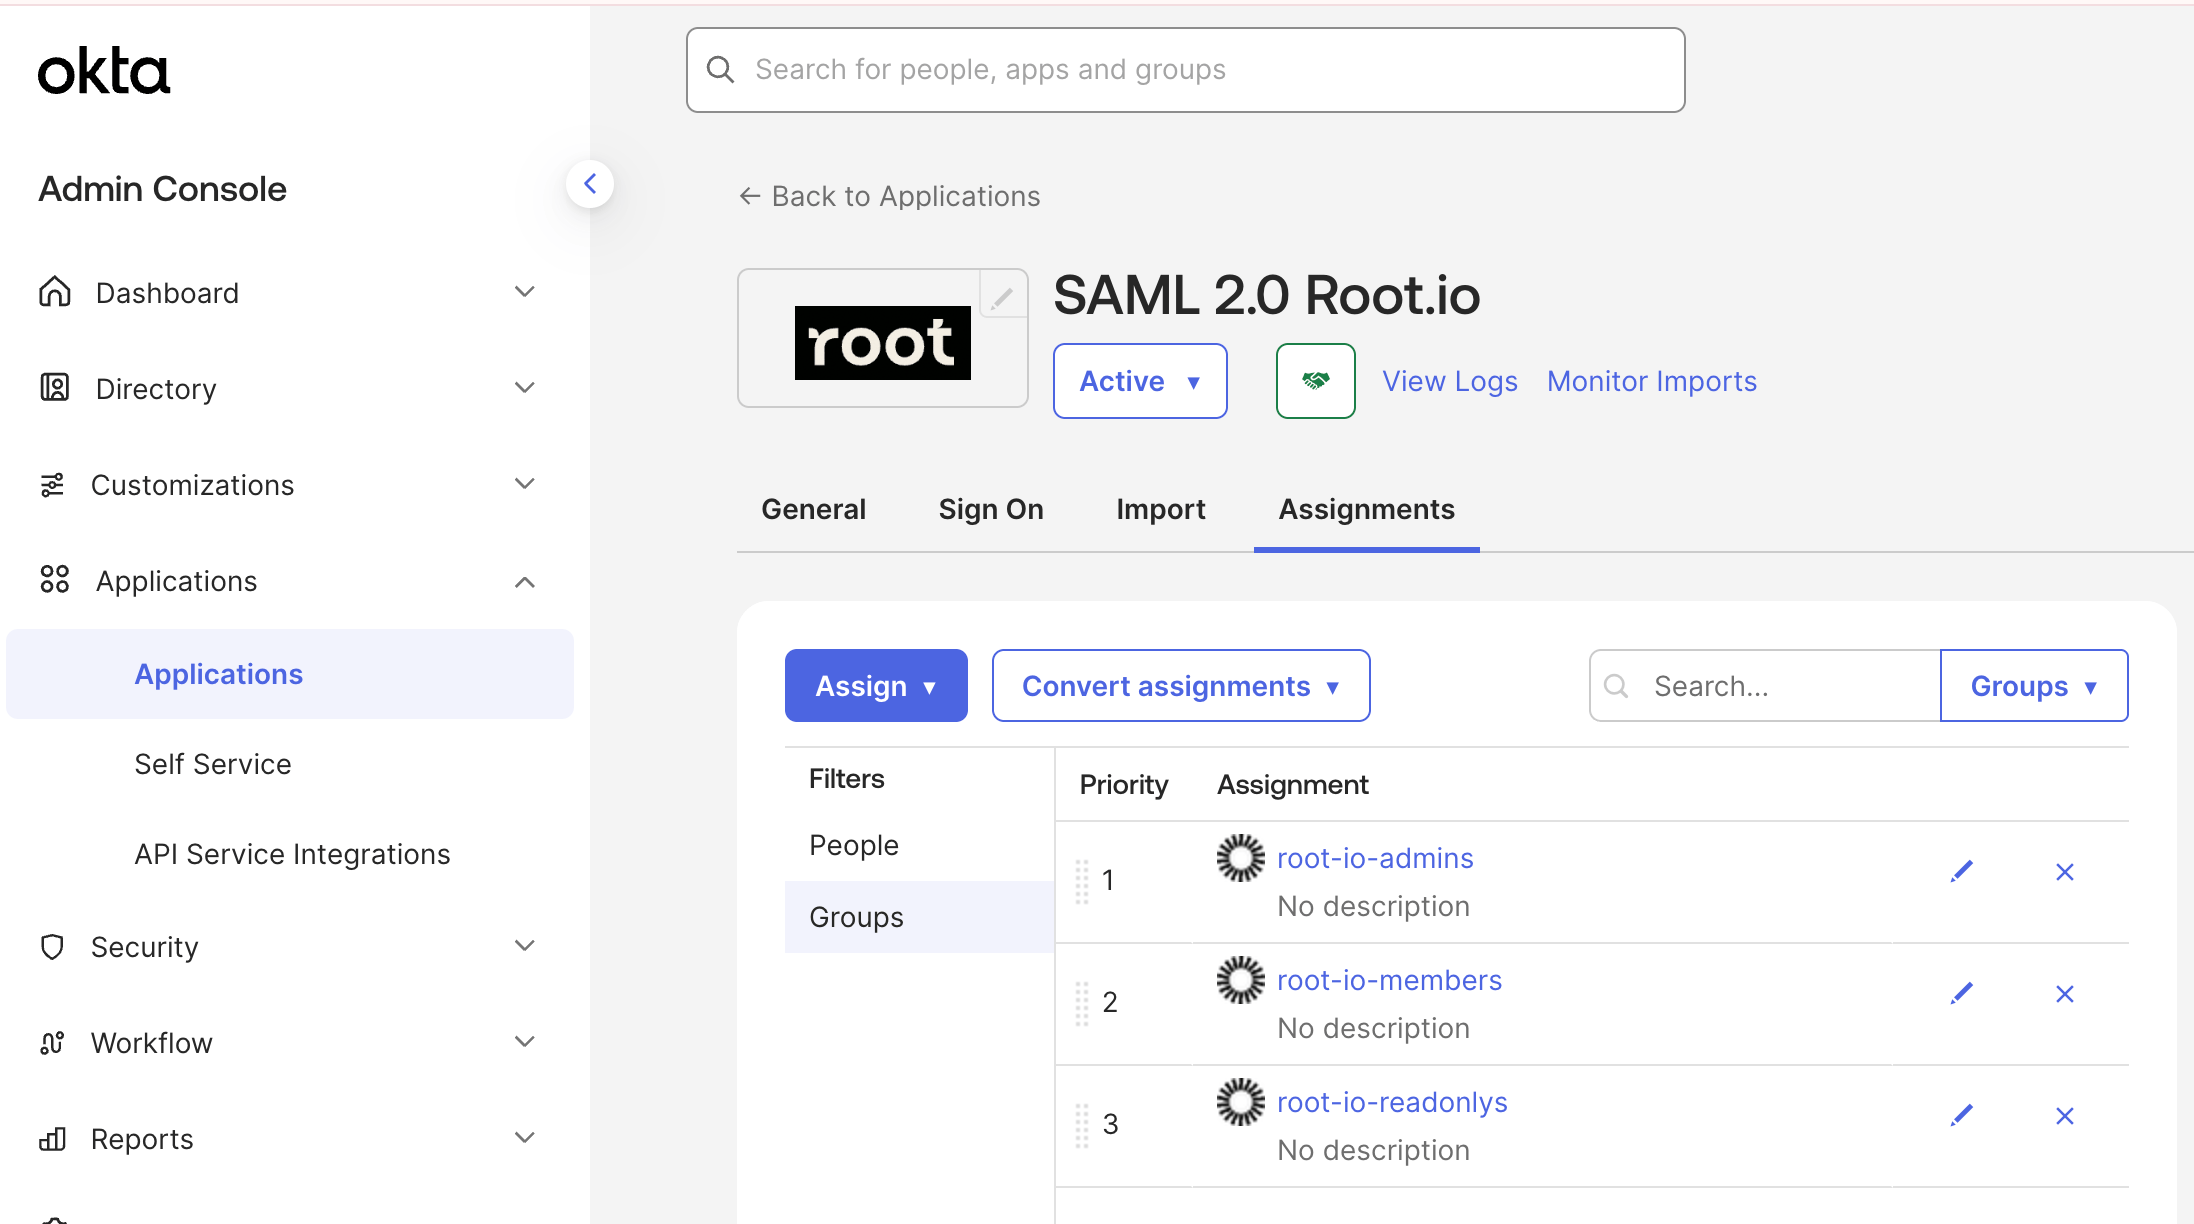 the connection will work without groups, but without them set up correctly,
all users will be in read only mode.
When moving a member from one group to another or removing from a group, the changes in it's role in Root.io app will only update once after the user goes through the app's login page.
## Step 3: Hand Off to Root
Once Okta is configured, provide the following to your Root support contact:
| Item | Where to find it |
| ------------------------------------ | --------------------------- |
| Connection name (`CONNECTION_NAME`) | Agreed in Step 1 |
| Identity Provider Single Sign-On URL | Okta Sign On tab |
| X.509 certificate file (`okta.cert`) | Okta Sign On tab > Download |
| The names of the created groups | Okta groups |
Root will complete the Auth0 configuration and confirm when the connection is ready to test.
## Step 4: Verify the Integration
Once Root confirms setup is complete:
1. Log in to the Root platform at [app.root.io](https://app.root.io) using your Okta credentials
2. Confirm successful authentication and that your user profile (name, email) appears correctly
## Troubleshooting
| Symptom | Likely cause | Resolution |
| -------------------------------------------------------- | ------------------------------------------------------------ | ---------------------------------------------------------------------------------------------------------- |
| `Invalid audience` or `SAML assertion audience mismatch` | Audience URI in Okta doesn't match the Auth0 connection name | Verify the Audience URI is exactly `urn:auth0:slimdotai:CONNECTION_NAME` with your correct connection name |
| `Invalid certificate` or signature validation failure | Certificate format mismatch or wrong cert uploaded | Re-download the X.509 certificate from Okta in PEM format and resend to Root |
| Login redirects back to Okta without error | Clock skew between Okta and Auth0 | Confirm your Okta org's system clock is accurate; SAML assertions expire after a few minutes |
| User authenticates but profile fields are empty | Missing attribute statements | Verify the three attribute statements (`firstName`, `lastName`, `email`) are configured per Step 2.4 |
If you encounter other issues, contact Root support with any error messages or screenshots.
the connection will work without groups, but without them set up correctly,
all users will be in read only mode.
When moving a member from one group to another or removing from a group, the changes in it's role in Root.io app will only update once after the user goes through the app's login page.
## Step 3: Hand Off to Root
Once Okta is configured, provide the following to your Root support contact:
| Item | Where to find it |
| ------------------------------------ | --------------------------- |
| Connection name (`CONNECTION_NAME`) | Agreed in Step 1 |
| Identity Provider Single Sign-On URL | Okta Sign On tab |
| X.509 certificate file (`okta.cert`) | Okta Sign On tab > Download |
| The names of the created groups | Okta groups |
Root will complete the Auth0 configuration and confirm when the connection is ready to test.
## Step 4: Verify the Integration
Once Root confirms setup is complete:
1. Log in to the Root platform at [app.root.io](https://app.root.io) using your Okta credentials
2. Confirm successful authentication and that your user profile (name, email) appears correctly
## Troubleshooting
| Symptom | Likely cause | Resolution |
| -------------------------------------------------------- | ------------------------------------------------------------ | ---------------------------------------------------------------------------------------------------------- |
| `Invalid audience` or `SAML assertion audience mismatch` | Audience URI in Okta doesn't match the Auth0 connection name | Verify the Audience URI is exactly `urn:auth0:slimdotai:CONNECTION_NAME` with your correct connection name |
| `Invalid certificate` or signature validation failure | Certificate format mismatch or wrong cert uploaded | Re-download the X.509 certificate from Okta in PEM format and resend to Root |
| Login redirects back to Okta without error | Clock skew between Okta and Auth0 | Confirm your Okta org's system clock is accurate; SAML assertions expire after a few minutes |
| User authenticates but profile fields are empty | Missing attribute statements | Verify the three attribute statements (`firstName`, `lastName`, `email`) are configured per Step 2.4 |
If you encounter other issues, contact Root support with any error messages or screenshots.